 Skip to content
Design Build Contractor in Washington, DC, Arlington, Alexandria, Falls Church, McLean & Bethesda
If you are searching for a trusted design-build contractor in Washington DC, Arlington, Alexandria, Falls Church, McLean, or Bethesda, our team provides complete remodeling and construction services designed to make your project simple and stress-free.
Our design-build approach brings design, planning, and construction together under one team, allowing homeowners to enjoy a smoother process, better communication, and outstanding results.
Whether you are planning a home addition, kitchen renovation, bathroom remodel, or a full home transformation, we help turn your ideas into beautifully finished spaces.
Architectural Questions & Answers
Building Codes & Key Dimensions Explained
Homeowners often have many questions before starting a remodeling project or building a new home. Understanding the basics of building codes, zoning rules, and safety requirements can help you plan your project correctly and avoid costly mistakes.
Below are answers to some of the most common architectural and construction questions homeowners ask.
Read More
Do I Need a Building Permit?
In most cases, yes. If your project involves structural changes, electrical work, plumbing, or HVAC systems, a permit is typically required.
Building permits ensure that construction meets safety standards and local building codes. Skipping the permit process can lead to fines, failed inspections, or complications when selling your home in the future.
Who Controls the Size of My House?
Your local zoning department regulates how large your home can be. Zoning rules often control:
- Maximum building height
- Setbacks from property lines
- Lot coverage limits
- Floor area restrictions
Even if the building code allows something, zoning regulations may limit it. Always verify zoning requirements before designing an addition or new structure.
What Is the Minimum Ceiling Height?
For habitable rooms such as living rooms, bedrooms, kitchens, and finished basements, the minimum ceiling height is typically 7 feet.
Bathrooms and hallways may have slight variations, but 7 feet is generally the standard for primary living spaces.
What Qualifies as a Legal Bedroom?
A bedroom must meet minimum size requirements to be considered legal.
Typical requirements include:
- Minimum floor area: 70 square feet
- Minimum dimension: 7 feet in at least one direction
Rooms smaller than these dimensions may not legally qualify as bedrooms for appraisal or resale purposes.
Does a Bedroom Need an Emergency Exit?
Yes. Every bedroom must include an emergency egress window or exterior door.
This allows occupants to escape during an emergency and provides access for firefighters. The window must also meet specific minimum size and height requirements.
Can I Remove Any Wall in My House?
No. Some walls are load-bearing, meaning they support the structure above.
Removing a load-bearing wall requires:
- Structural engineering analysis
- Proper beam design
- Building permits
- Inspections
Never remove a wall without confirming whether it is structural.
What Are the Residential Stair Requirements?
Residential stairs must meet safety guidelines, including:
- Maximum riser height: 7¾ inches
- Minimum tread depth: 10 inches
- Minimum stair width: 36 inches
Incorrect stair dimensions are one of the most common building code violations in residential construction.
Are Handrails Required?
Yes. If a stairway has four or more risers, a handrail is required.
The typical handrail height must be between 34 and 38 inches above the stair tread nosing.
Handrails significantly improve safety and reduce fall risk.
Is Bathroom Ventilation Required?
Yes. Bathrooms must have either a window or an exhaust fan vented to the exterior.
Proper ventilation helps prevent:
- Moisture buildup
- Mold growth
- Structural damage over time
What Are the Minimum Bathroom Clearances?
Bathrooms must meet minimum space requirements for usability and safety.
Typical minimums include:
- Toilet clearance:
- 15 inches from centerline to side wall
- 21 inches clear space in front
- Toilet clearance:
-
- Shower size:
- Minimum 30 inches by 30 inches
- Shower size:
Do Smoke Alarms Need to Be Upgraded During a Remodel?
Often, yes. During remodeling projects, building codes typically require interconnected smoke alarms.
Many jurisdictions require them to be hardwired with battery backup to improve safety throughout the home.
Are Carbon Monoxide Alarms Required?
Yes, if your home includes:
- Fuel-burning appliances
- A fireplace
- An attached garage
Carbon monoxide alarms are usually required outside sleeping areas.
Do Additions Need to Meet Energy Codes?
Yes. New additions and major remodels must comply with current energy efficiency codes.
This may include requirements for:
- Insulation levels
- Energy-efficient windows
- Air sealing
- HVAC system performance
Energy compliance is mandatory for most projects.
Are There Minimum Window Size Requirements?
Yes. For natural light and ventilation, building codes typically require:
- Natural light: Window area equal to at least 8% of the room’s floor area
- Ventilation: Openable window area equal to at least 4% of the floor area
Are Inspections Required During Construction?
Yes. Most construction projects require inspections at multiple stages, including:
- Foundation inspection
- Framing inspection
- Electrical inspection
- Plumbing inspection
- HVAC inspection
- Insulation inspection
- Final inspection
Work generally cannot proceed to the next stage until it passes inspection.
Final Thoughts
Building codes are more than just regulations — they are safety standards designed to protect homeowners and ensure quality construction.
Before starting any remodel, addition, or new construction project, it is always recommended to consult with a licensed architect, engineer, or your local building department.
Proper planning at the beginning can save time, money, and stress later.
Top 10 Bedroom Design Mistakes (and Smart Tips for Home Additions)
When planning a new bedroom addition, many homeowners focus mainly on style — paint colors, furniture, and décor. But the details that truly make a bedroom comfortable, functional, and code-compliant are often overlooked.
Whether you’re working with a builder or designing your own home addition, avoiding these common mistakes can save time, money, and frustration.
Below are the top 10 bedroom design mistakes homeowners make — and professional tips to get it right from the start.
Read More
1. Building a Bedroom That’s Too Small
One of the most common mistakes is designing a bedroom that’s simply too small for real living.
A 10 × 10 room might technically fit a queen bed, but once you add nightstands and a dresser, the space becomes cramped.
Professional recommendation:
- Ideal bedroom size: 11 × 12 feet or larger
- Comfortable space: 130 sq. ft. or more
Building code minimums:
- Minimum floor area: 70 sq. ft.
- Minimum ceiling height: 7 feet
💡 Tip: Always draw your furniture layout to scale before finalizing the design. It prevents costly changes later.
2. Poor Window Placement & Egress Requirements
Windows are more than decoration — they are critical for safety, light, and ventilation.
Every bedroom must include at least one operable egress window that allows emergency escape.
Typical code requirements:
- Minimum opening: 5.7 sq. ft.
- Maximum sill height: 44 inches from the floor
Design considerations:
- East-facing windows provide morning light
- West-facing windows can cause afternoon overheating
💡 Tip: Use Low-E double-pane windows to improve energy efficiency and reduce condensation.
3. No Sound Insulation
Noise problems are one of the most common complaints after construction is finished.
Laundry rooms, bathrooms, and hallways next to bedrooms can create unwanted sound.
Better solutions:
- Insulate interior walls with R-11 or R-13 batts
- Install solid-core doors instead of hollow ones
- Upgrade to 5/8″ drywall with resilient channel for high-end sound control
These upgrades greatly improve comfort and resale value
4. Poor Electrical & Lighting Planning
Electrical layouts are often rushed during framing, but they significantly affect how a room feels.
Standard code guidelines:
- Outlets every 6–8 feet along walls
- At least one switched ceiling or wall light
Professional lighting design uses three layers:
- Ambient lighting – main ceiling lights
- Task lighting – bedside lamps or sconces
- Accent lighting – soft evening lighting
💡 Tip: Install dimmer switches — they’re inexpensive but dramatically improve the atmosphere.
5. Incorrect HVAC Vent Placement
Bad vent placement can make a bedroom uncomfortable year-round.
Common mistakes include:
- Vents blowing directly onto the bed
- Return vents blocked by furniture
Best practice:
- Place supply vents near exterior walls or windows
- Ensure your HVAC system can handle the additional load
If the addition is far from the main system, consider:
- Mini-split systems
- Separate HVAC zones
These solutions improve comfort and efficiency.
6. Forgetting Closet Space
A bedroom without a closet may not qualify as a bedroom for resale purposes, even if building codes don’t require one.
Recommended closet sizes:
- Reach-in closet: 2 ft deep × 5 ft wide
- Small walk-in closet: 4 ft × 6 ft
💡 Tip: Use sliding or pocket doors to save space in smaller rooms.
7. Poor Furniture Layout and Circulation
Many homeowners frame the walls first and plan furniture later — which often causes layout problems.
A well-designed bedroom should allow comfortable movement.
Recommended clearances:
- 3 feet of walking space around the bed
- 30 inches between the bed and door swing
Design tips:
- Avoid placing the bed directly across from a bathroom door
Maintain symmetry and privacy
8. Harsh or Cold Lighting
Bedrooms should feel calm and relaxing, not like an office.
Recommended lighting temperature:
- 2700K – 3000K for warm lighting
- Avoid 4000K unless it’s for task lighting
Use a layered lighting approach:
- Dimmable recessed lights
- Bedside sconces
- Soft accent lighting
This creates a comfortable and relaxing atmosphere.
9. Choosing the Wrong Colors and Finishes
Trendy or dark colors may look great in photos but can make a bedroom feel heavy or small.
Better choices include:
- Warm whites
- Soft beige tones
- Light gray-blue colors
Recommended paint finishes:
- Matte or eggshell (hide imperfections better)
Add warmth with:
- Area rugs
- Upholstered headboards
- Curtains and fabric textures
These elements also help absorb sound.
10. Poor Door Placement and Privacy
A bedroom should feel like a private retreat, not a room that opens directly into the living room.
Good design strategies include:
- Placing the door on a side wall
- Adding a short hallway or offset entrance
Standard door clearance:
- Minimum 32-inch door opening
For a higher-end feel:
- Use solid-core doors
- Install soft-close hardware
Bonus: Safety & Energy Efficiency Tips
Before completing your bedroom addition, confirm these important building details:
- Smoke detectors and carbon monoxide detectors
- Exterior wall insulation R-21 or higher
- Ceiling insulation R-49
- Energy-efficient windows with U-factor below 0.32 (common DMV standard)
These upgrades improve safety, energy efficiency, and long-term comfort.
Final Thoughts
When planning a bedroom addition, think beyond paint colors and furniture.
Great bedroom design focuses on:
- Comfort
- Light
- Privacy
- Smart building code compliance
If you’re working with an architect or builder, discussing these details early can save time, money, and construction headaches.
Arlington County Residential Setback & Yard Requirements
Understanding setback and yard requirements is essential when planning a home addition, building a new house, or adding an accessory structure in Arlington County, Virginia. These zoning regulations determine how close structures can be built to property lines and help maintain neighborhood spacing, safety, and access to light and air.
Below is an overview of the key setback requirements for residential properties in Arlington County.
Read More
Interior Lot Setbacks
For single-family homes on interior lots, the required side yard setbacks depend on the zoning district.
R2-7, R-5, and R-6 districts
- Total side yard: 18 feet
- Minimum on one side: 8 feet
- Opposite side: 10 feet
R-8 district
- Total side yard: 21 feet
- Minimum on one side: 8 feet
- Opposite side: 13 feet
R-10 district
- Total side yard: 24 feet
- Minimum on one side: 8 feet
- Opposite side: 16 feet
R-20 district
- Total side yard: 30 feet
- Minimum on one side: 8 feet
- Opposite side: 22 feet
These setbacks ensure adequate spacing between homes and allow for proper access, ventilation, and safety.
Corner Lot Setbacks
Corner lots have unique requirements because they face two streets.
The shorter street-facing side is typically considered the front yard, while the other side functions as a side yard. Setback requirements are determined by the Arlington County Zoning Ordinance, particularly Sections 3.2.6.A.1(e) and 3.2.6.A.2(b).
Because corner lots can vary in configuration, property owners should verify which street is designated as the official front yard before applying setback measurements.
Detached Accessory Buildings
Detached accessory buildings include structures such as:
- Detached garages
- Storage sheds
- Accessory dwelling units (ADUs)
Setback requirements vary depending on the size and height of the structure.
For one- to one-and-a-half-story accessory buildings, side and rear yard setbacks are regulated under Sections 3.2.6.A.2(e)(1) and (2).
For two-story accessory structures, requirements are outlined in Section 3.2.6.A.2(e)(4).
Maximum Size Limits
- R-5 and R-6 zones: Maximum footprint of 560 square feet
- All other residential districts: Maximum footprint of 650 square feet
These limits help maintain open space and prevent overcrowding within residential properties.
Irregular Lots
Some residential lots have irregular shapes, such as pipe-stem lots or triangular lots. These configurations require special considerations when determining setbacks.
Pipe-stem lots are addressed under Section 10.1.4 of the zoning ordinance. Definitions for side and rear lot lines can be found in Section 18.2.
In some cases, a corner lot with three street frontages may not have a traditional rear yard. Instead, it may consist only of front and side yards.
Because irregular lots can vary significantly, careful interpretation of lot lines is necessary when calculating setbacks.
Permitted Encroachments
Certain structures may extend slightly into required setbacks. These are known as permitted encroachments and are described in Section 3.2.6.A.3(a).
Uncovered and unenclosed features such as:
- Decks
- Stairs
- Areaways
- Stoops
- Window wells
may extend up to 4 feet into a setback, provided they remain at least 5 feet from the side property line.
Additional encroachment allowances include:
- Covered but unenclosed porches, which may extend into the front yard setback
- Chimneys and bay windows that do not contain floor space, which may extend up to 18 inches into a setback
Two-Family and Multi-Family Setbacks
Setback requirements for two-family and multi-family buildings depend largely on building height.
Interior Lots
- Buildings up to 25 feet in height require 10-foot side yards.
For taller buildings, an additional 1 foot of side yard is required for every 2.5 feet above 25 feet.
Example:
A 35-foot tall building requires approximately 14 feet of side yard setback.
Rear yards must have a minimum depth of 25 feet.
Corner Lots
For corner lots, the same height-based rules apply to side yards.
Front setbacks for multi-family buildings must be:
- 50 feet from the street centerline, and
- Not less than 25 feet from the right-of-way
These requirements are outlined in Section 3.2.6.A and D of the Arlington County Zoning Ordinance.
Final Notes
Before starting any residential construction project in Arlington County, property owners should:
- Confirm the zoning district
- Identify the lot type
- Verify all setback measurements using the Arlington County Zoning Ordinance
For detailed guidance or property-specific questions, contact the Arlington County Zoning Division.
Best Design-Build Arlington, VA
If you’re a homeowner in Arlington, VA planning to build or renovate, one of the biggest mistakes is hiring separate designers and contractors—this often leads to delays, miscommunication, and unexpected costs. A design-build approach solves this by combining design and construction into one streamlined process, giving you better control over your budget, timeline, and final results.
As a trusted design-build company in Arlington, VA, we help homeowners simplify complex projects, avoid costly surprises, and create spaces that are both functional and long-lasting.
Setback Requirements for Home Additions in Bethesda, MD
Thinking about expanding your home in Bethesda, Maryland? Before starting your project, it’s critical to understand setback requirements—one of the most important zoning rules that will determine what you can build and where.
This guide explains what setbacks are, why they matter, and how to make sure your home addition complies with Montgomery County regulations.
Read More
What Are Setbacks?
Setbacks are the minimum required distances between your home (or addition) and your property lines.
These regulations help:
- Maintain privacy between homes
- Allow natural light and airflow
- Protect underground utilities
- Improve fire safety
Preserve neighborhood appearance and property values
Types of Setbacks
There are three main setback zones:
- Front Yard Setback
Distance from the street to the front of your home - Side Yard Setbacks
Distance between your home and neighboring property lines - Rear Yard Setback
Distance from the back of your home to the rear property line
👉 Your addition must fit entirely within the buildable area created by these setbacks.
How to Find Your Zoning in Bethesda
Setback requirements depend on your property’s zoning classification.
Common residential zones in Bethesda include:
- R-60
- R-90
- R-200
- RE-1 / RE-2
How to check your zoning:
- Visit the Montgomery County GIS Zoning Map
- Enter your property address
- Identify your zoning category (e.g., R-60)
Your zoning determines:
- Setback distances
- Lot coverage limits
- Height restrictions
Setback Requirements by Zone
R-60 Zone (Most Common in Bethesda)
- Front: 25 ft (or match established building line)
- Sides: Minimum 8 ft on one side, 18 ft total
- Rear: 20 ft
- Max Lot Coverage: 35% (30% if lot < 6,000 sq ft)
- Max Height: 35 ft
R-90 Zone
- Front: 30 ft
- Sides: 12 ft each
- Rear: 25 ft
R-200 Zone (Larger Lots)
- Front: 40 ft
- Sides: 17 ft minimum per side, 35 ft total
- Rear: 30 ft
RE-1 / RE-2 Zones (Estate Lots)
- Front: 50 ft
- Sides: 17–20 ft minimum (35–40 ft total)
- Rear: 35–40 ft
⚠️ Note: Corner lots and irregularly shaped properties may have additional setback requirements.
Accessory Structures (Garages, Sheds, ADUs)
Planning to build a detached structure? These are considered accessory buildings and follow separate rules:
- Must be located in the rear yard
- Minimum 5 ft setback from rear and side property lines
- Larger/taller structures may require greater setbacks
- Detached garages may need additional review for:
- Driveway placement
- Utility connections
- Driveway placement
What Can Encroach Into Setbacks?
Some features are allowed to extend slightly into setback areas. These are called encroachments.
Common Allowances:
- Roof eaves & gutters: Up to 2.5 ft
- Bay windows: Up to 3 ft (max 50% of wall length)
- Porches & steps:
- Up to 9 ft into front/rear setbacks
- Up to 3 ft into side setbacks
- Up to 9 ft into front/rear setbacks
- HVAC units & utilities: May encroach up to 5 ft (conditions apply)
Permits & Design Tips
Before construction, you must apply through the Montgomery County Department of Permitting Services (DPS).
Your application should include:
- Site plan with property lines
- Proposed addition layout
- Existing structures
- Setback measurements
Tips to Avoid Delays:
- Work with a local architect or designer
- Hire a licensed land surveyor
- Check for:
- Utility easements
- Tree protection areas
- Stormwater restrictions
- Utility easements
- If your lot is non-conforming, you may need a variance
Example: Buildable Area Calculation
Let’s say your property is:
- Zoned R-60
- Lot size: 60 ft wide × 100 ft deep
Required setbacks:
- Front: 25 ft
- Rear: 20 ft
- Sides: 8 ft + 10 ft
Buildable space:
- Width: 60 – 18 = 42 ft
- Depth: 100 – 45 = 55 ft
👉 Your addition must fit within this buildable envelope, while also meeting height and lot coverage limits.
Biggest Residential Home Design & Build Mistakes
Designing a home isn’t just about how it looks—it’s about how it works every single day.
Many homeowners make decisions during design and construction that lead to frustration, unnecessary costs, and long-term regret.
Here are the most common mistakes—along with real-world examples to help you avoid them.
Read More
1. Designing for Looks Instead of Daily Living
A beautiful home means nothing if it doesn’t function well.
Example: Imagine a high-end kitchen with a stunning island—but the layout doesn’t work.
The fridge, sink, and stove are too far apart, making cooking inefficient and tiring. On top of that, there’s little counter space next to key areas for prep work.
Another common issue is tight spacing around the island.
Many people assume 36 inches is enough—but it often feels cramped.
In reality, 42–48 inches provides a much smoother and more comfortable flow.
👉 A well-designed home should make your life easier—not harder.
2. Not Planning for the Future
Many homeowners design based only on their current needs, not their future.
Example: A family of two or three may not think about needing additional bedrooms or bathrooms later—but life changes.
A home should be designed to serve you for decades—not just today.
Thinking ahead also protects your resale value.
👉 Always plan for the next 10–20+ years.
3. Poor Floor Plan Layout
Layout impacts comfort more than almost anything else in a home.
Common mistakes include:
- A half bathroom facing directly into the kitchen
- Long, narrow hallways that waste space
- Basement access through the kitchen
- No coat closet near the entry
- A living room that feels too small
- Limited natural light in main living areas
- An overall awkward or disconnected layout
👉 Great design separates quiet and active spaces and creates a home that feels natural, functional, and inviting.
4. Not Enough (or Poorly Designed) Storage
Lack of storage is one of the biggest regrets homeowners have.
Example: A kitchen without a pantry quickly becomes cluttered—groceries end up on countertops and in random cabinets.
In bedrooms, closets may be:
- Too small
- Poorly laid out
- Hard to access due to awkward walls or design
Storage isn’t just about quantity—it’s about usability.
👉 Plan storage early and focus on both capacity and accessibility.
5. The Biggest Mistake: Rushing the Planning Phase
Most problems don’t happen during construction—they start during planning.
When planning is rushed:
- Important details get overlooked
- Decisions are made too quickly
- Daily functionality isn’t fully considered
Something might look perfect on paper—but fail in real life.
Ask yourself:
- How will I move through this space?
- Where will everything go?
- How will this feel day-to-day?
👉 Take your time—because every decision you make now shapes how you live later.
Build It Right the First Time
If you’re planning a custom home or remodel, success comes down to realistic planning and working with the right professionals.
An experienced contractor can save you:
- Time
- Money
- Stress
At DC Home Remodeling & Home Addition, we specialize in creating smart, functional, and high-quality spaces—without the headaches.
📞 Call us: 703-980-3266
🌐 Visit: www.dc-homeremodeling.com
How to Hire a Good Architect for Your Residential Project (Complete Homeowner Guide)
Read More
Why Hiring the Right Architect Matters
A skilled architect does more than draw plans—they:
- Turn your ideas into functional, beautiful designs
- Maximize your budget and space
- Ensure compliance with local building codes
- Help avoid costly mistakes during construction
Choosing the wrong architect can lead to delays, budget overruns, and design issues.
1. Define Your Project Goals Clearly
Before contacting architects, clarify:
- Project type (new home, renovation, extension)
- Budget range
- Timeline
- Style preferences (modern, traditional, minimalist, etc.)
Tip: Create a folder with inspiration photos (Pinterest, Instagram, magazines) to communicate your vision clearly.
3. Review Their Portfolio Carefully
A strong portfolio should show:
- Variety of completed homes
- Attention to detail
- Functional layouts, not just aesthetics
Ask yourself:
- Do I like their design style?
- Can they adapt to different client needs?
4. Check Credentials and Licenses
Always verify:
- Professional license in your state/country
- Membership in architectural associations (AIA, RIBA, etc.)
- Insurance coverage
This protects you legally and ensures professional standards.
5. Read Reviews and Ask for References
Look for:
- Online reviews (Google, Houzz, Yelp)
- Testimonials from past clients
Ask the architect for references and inquire:
- Was the project completed on time?
- Were there budget issues?
- How was communication?
6. Interview Multiple Architects
Don’t settle on the first option. Interview at least 2–3 architects.
Ask questions like:
- What is your design process?
- How do you handle budget constraints?
- Do you provide construction oversight?
- How do you communicate with clients?
Pro Tip: Choose someone who listens carefully—not just someone who talks.
7. Understand Their Fees and Services
Architect fees can vary:
- Percentage of construction cost (typically 5%–15%)
- Fixed fee
- Hourly rate
Make sure you understand:
- What’s included (design, drawings, site visits)
- What’s extra (revisions, permits, 3D renderings)
8. Evaluate Communication and Compatibility
You’ll work closely with your architect for months, so:
- Choose someone you feel comfortable with
- Ensure they respond promptly
- Look for clear and transparent communication
A good working relationship is essential for project success.
9. Review the Contract Carefully
Before signing:
- Check scope of work
- Timeline and deliverables
- Payment schedule
- Revision policy
Never start a project without a written agreement.
10. Red Flags to Avoid
Be cautious if an architect:
- Avoids sharing past work
- Gives vague cost estimates
- Has poor communication
- Lacks proper licensing
Final Thoughts
Our Clients Video Testimonials
Full House Remodel & Two-Level Home Addition in Arlington, VA
Full House Remodel in Old Town Alexandria, VA
Full House Remodel in Falls Church, VA
Full House Remodel & Home Addition in McLean, VA
Two-Level Deck Addition, Siding & Window Replacement in Washington, DC
Full House Remodel & 2-Level Home Addition in Alexandria, VA
Whole House Remodeling in Washington, DC
Top Rated Master Bathroom Remodel Company in Bethesda MD
Before
After
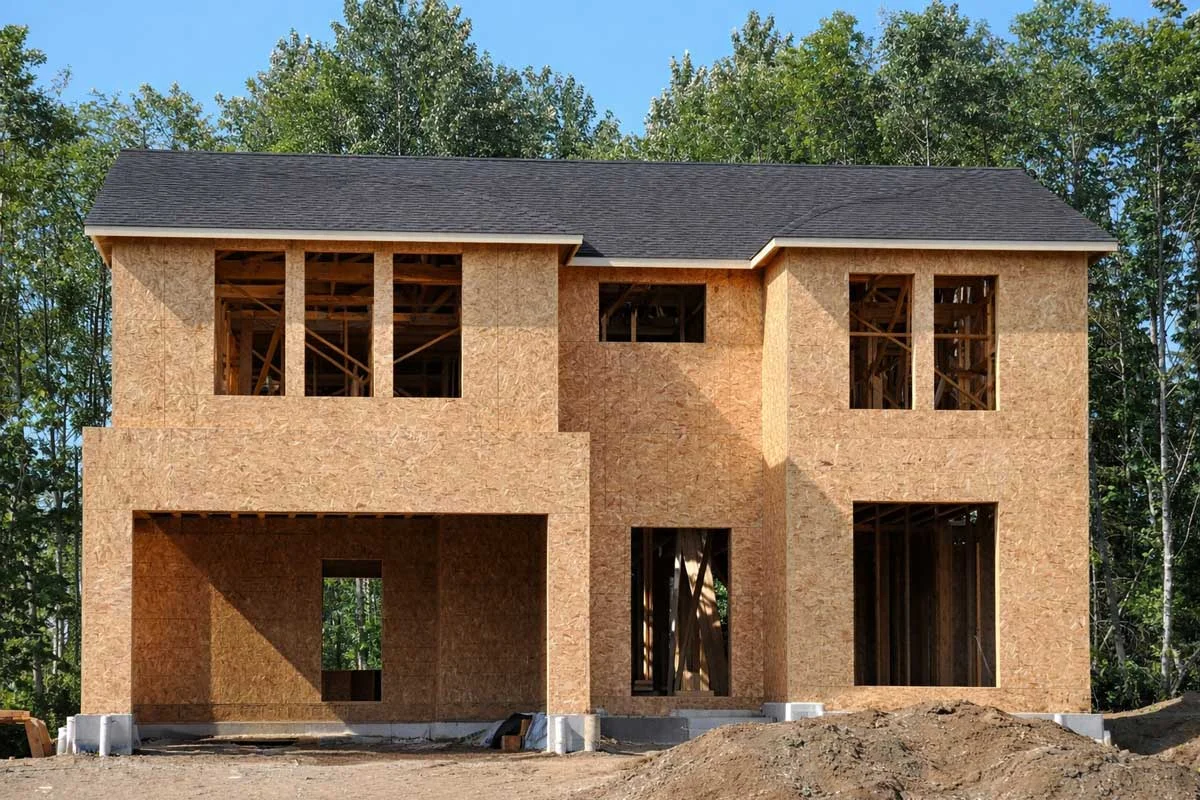
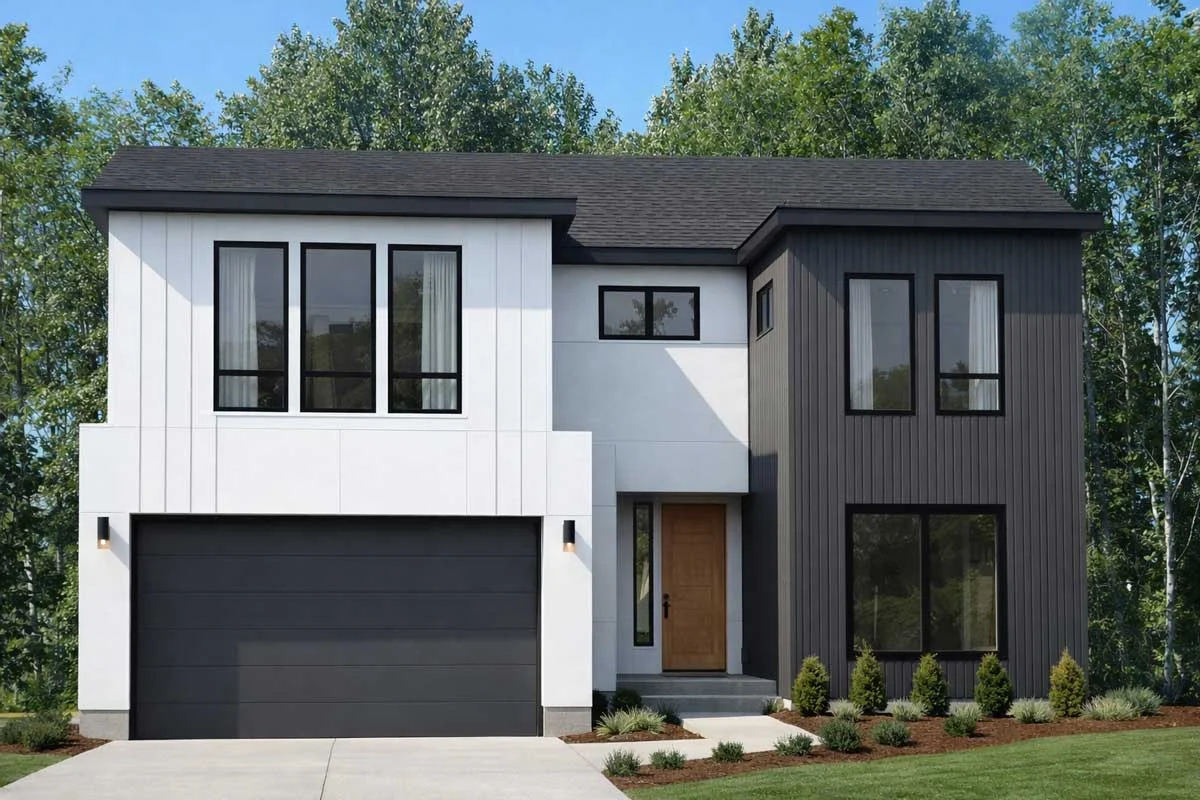
Modern Design & Build Project in McLean, VA
This modern home in McLean, VA was completed by DC Home Addition & Remodeling, a trusted design build company in McLean VA. From framing to final finishes, our team delivered a clean, contemporary design with high-quality craftsmanship and attention to detail.
We provided full design-build services, including planning, construction, and exterior finishing. The home features bold modern siding, large windows, and a sleek, functional layout—perfect for today’s lifestyle.
If you’re looking for home remodeling or a custom home builder in McLean Virginia, our team is ready to bring your vision to life.

Before
After
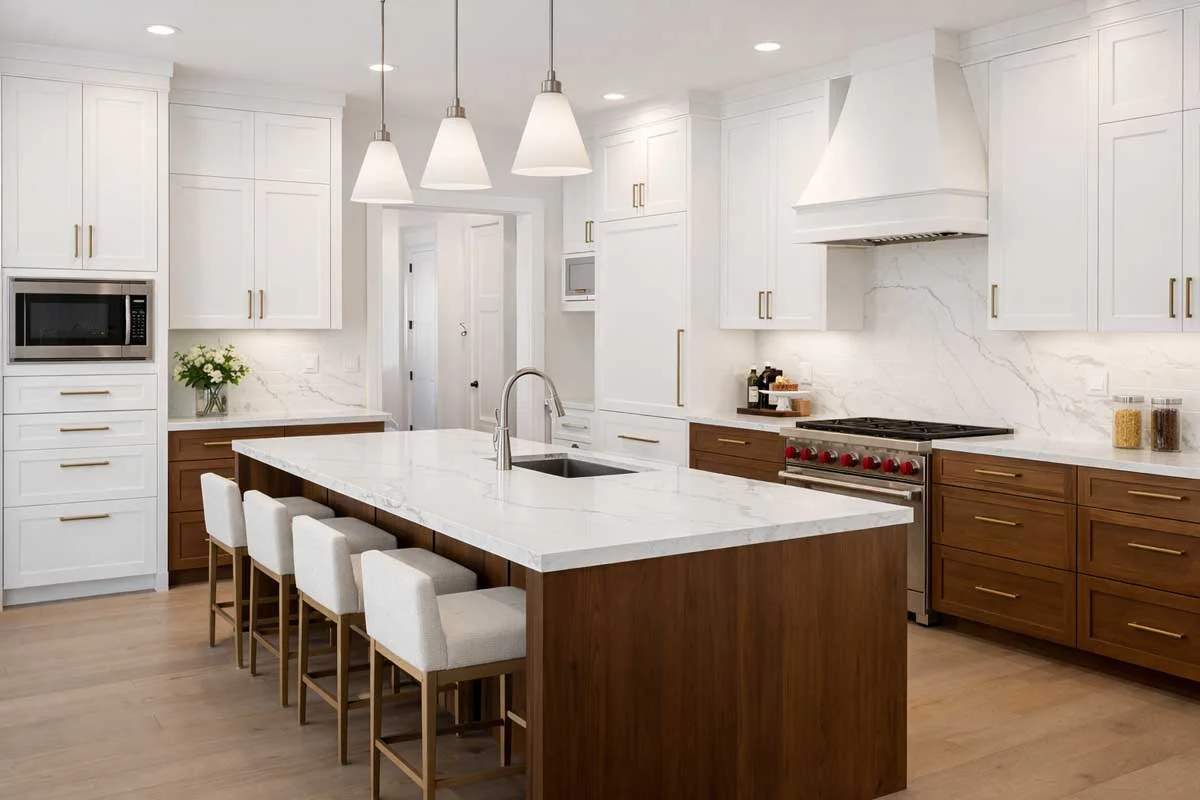
Kitchen Design & Remodeling Project in Arlington, VA
This kitchen remodeling project in Arlington, VA by DC Home Remodeling transformed an outdated space into a modern, functional kitchen. The original layout featured old oak cabinets, laminate countertops, and an inefficient design.
Read More
Our team redesigned the space with a fresh, contemporary layout, upgraded cabinetry, and high-quality finishes to improve both style and functionality.
If you’re searching for kitchen design and remodeling in Arlington VA or a trusted home remodeling contractor in Arlington Virginia, DC Home Remodeling delivers expert craftsmanship and modern design solutions.

Before

After
Custom Design & Build Home in Bethesda, MD
Looking for a trusted design build company in Bethesda MD? DC Home Addition & Remodeling specializes in creating high-end custom homes, home additions, and full home remodeling tailored to your lifestyle.
This project in Bethesda, Maryland showcases our full-service design and build expertise, from architectural planning to final construction. We focus on modern design, quality craftsmanship, and functional layouts that increase both comfort and property value.
Read More
As a leading custom home builder in Bethesda MD, we deliver:
- Complete design-build services
- High-quality materials and finishes
- Efficient project management
- Local expertise in Bethesda building codes
If you’re searching for home remodeling in Bethesda MD or a reliable design build contractor near you, our team is ready to bring your vision to life.
Before
After
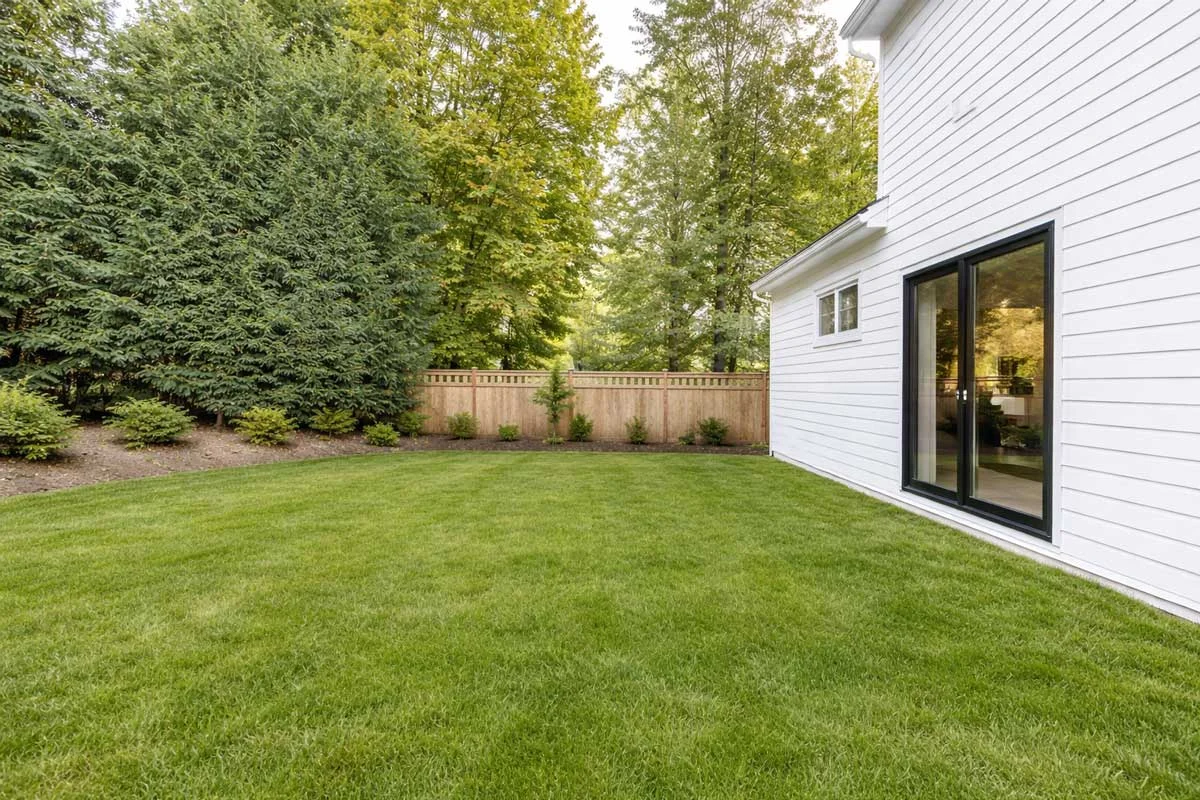
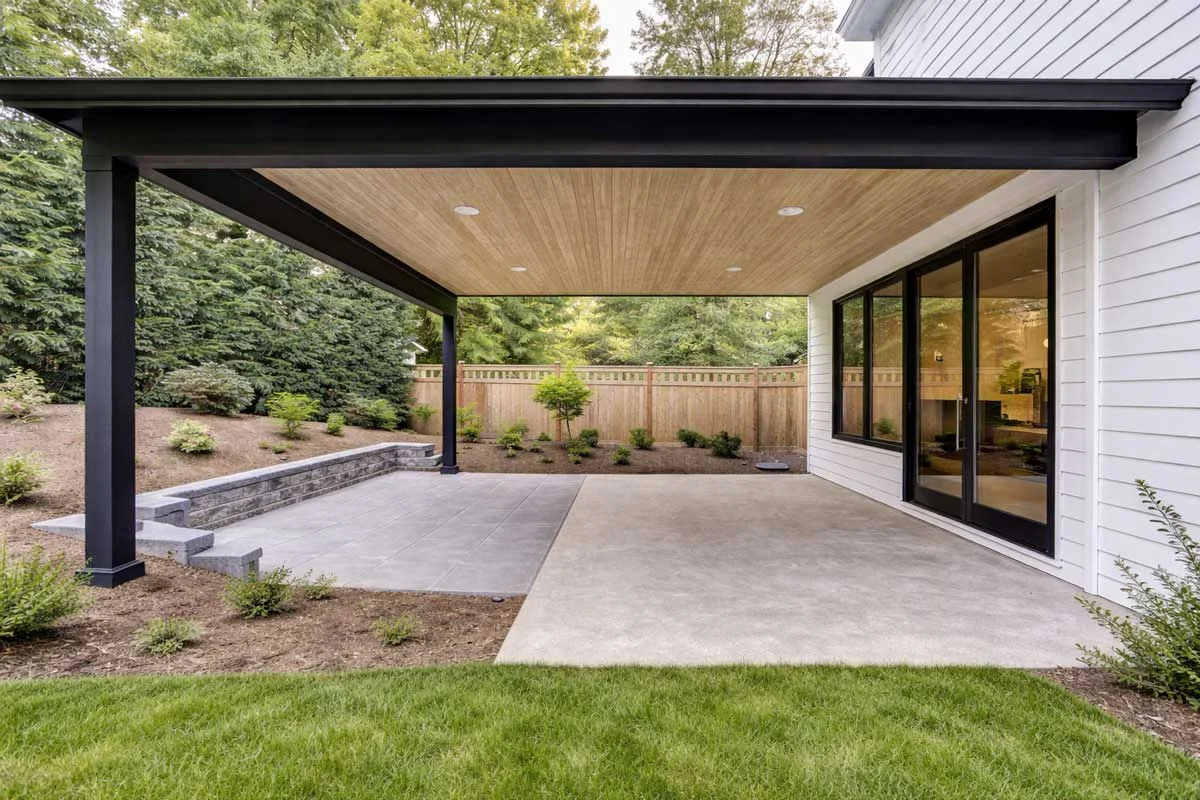
Full house Remodel in Alexandria VA
This backyard transformation project in Alexandria, Virginia was expertly designed and built by DC Home Remodeling, a trusted name in home additions and outdoor living spaces. The goal was to create a clean, open, and functional backyard that enhances both usability and curb appeal.
Read More
The project features a fully refreshed exterior with modern white siding, improved natural lighting through updated window placement, and a seamless transition from indoor to outdoor living. The space was simplified by removing outdated structures and hardscape elements, resulting in a fresh, low-maintenance lawn area perfect for relaxation and family use.
By focusing on simplicity and functionality, this design creates a timeless outdoor space that complements the home’s architecture while maximizing usable yard space. Whether for entertaining or everyday living, this Alexandria backyard renovation reflects quality craftsmanship and thoughtful design.
DC Home Remodeling specializes in home additions, exterior upgrades, and custom outdoor living solutions throughout Northern Virginia, delivering projects that combine style, durability, and long-term value.
Reviews from Our Valued Clients
Trustindex verifies that the original source of the review is Google. We had an amazing experience with our renovation, thanks to Mustafa and Galo. Mustafa provided invaluable guidance in designing our space and selecting the perfect materials, making the entire process enjoyable and stress-free. Galo executed the renovation flawlessly, transforming our vision into reality with exceptional craftsmanship. We're thrilled with how everything turned out and couldn't be happier with our beautiful new home!Posted onTrustindex verifies that the original source of the review is Google. Dear all, I am with DC Home Remodeling, and we are committed to providing the best service and experience for our clients. We truly appreciate our genuine customers who continue to support us. Recently, we noticed a number of negative reviews posted by individuals overseas that appear to be fraudulent. Please rest assured that we are currently working with Google to have this issue resolved. Thank you for your continued trust and support.Posted onTrustindex verifies that the original source of the review is Google. Elay managed our bathroom remodel from start to finish, and his professionalism stood out right away. He was always on top of the schedule, kept the crew organized, and made sure the worksite stayed clean every day. Small details we hadn’t even thought of were pointed out and taken care of, which made a huge difference in the final result. We couldn’t be happier with how everything turned out and appreciate how stress-free the whole process felt.Posted onTrustindex verifies that the original source of the review is Google. We hired DC Home Remodeling based on their reviews, we are very happy with the result, very profissional and knowledgeable, we hired them to relocate our kitchen and reconfigure the layout, we love our kitchen, We are very please with our decision, I suggest anyone to work with DC Home Remodeling you will not be disappointed.Posted onTrustindex verifies that the original source of the review is Google. DC Home Renovation transformed my kitchen into a stunning and functional space that exceeded my expectations. Their team was professional, detail-oriented, and kept me informed throughout the remodeling process, completing the project on time and within budget.Posted onTrustindex verifies that the original source of the review is Google. DC Home Remodeling did a great job transforming our primary bedroom and bathroom into a relaxing dreamscape! Mustafa and his team were very easy to work with. Also, huge shout out to the contractors! Their work was top notch and they timely addressed everything to make our vision came to life. This was my first remodeling experience and I wasn’t sure what to expect, but the experience was great with this team!Posted onTrustindex verifies that the original source of the review is Google. Me and my girlfriend loved the work Mr. Mustafa and his team did to our house in VA. Very professional from interior to exterior. Would definitely recommend 👌Posted onTrustindex verifies that the original source of the review is Google. Mustafa was very helpful and gave me excellent resources and advice!Posted onTrustindex verifies that the original source of the review is Google. Mustafa did a great job remodeling our bathroom! Very professional and clean workPosted onTrustindex verifies that the original source of the review is Google. DC Home Remodeling did an exceptional job, truly transforming our home with their impeccable craftsmanship and attention to detail. We couldn't be happier with their work!
Kitchen Design Tips
Design Smarter. Live Better.
Planning a kitchen remodel? These simple rules can save you time, money, and daily frustration.
Read More
1. Function Comes First
2. Follow the Work Triangle
3. Leave Enough Space
- Minimum: 36″
- Ideal: 42″
- Two cooks: 48″
More space = better movement and comfort.
4. Size Your Island Right
Don’t go too big.
Leave 42–48″ around it so your kitchen stays functional.
5. Set Proper Cabinet Height
6. Add Counter Space Where It Matters
- 24″ near the sink
- Space beside the stove
- Landing space by the fridge
Small details make everyday tasks easier.
7. Avoid Common Mistakes
- Don’t trap your fridge in a corner
- Keep dishwasher next to sink
- Make sure doors and drawers open fully
- Use drawers instead of deep cabinets
8. Design for Daily Use
Store items where you use them.
Less walking = better flow.
9. Use Proper Lighting
Layer your lighting and always include under-cabinet lights.
Good lighting = better function.
10. Focus on Smart Details
Final Thought
A great kitchen isn’t just about looks—
it’s about how well it works.